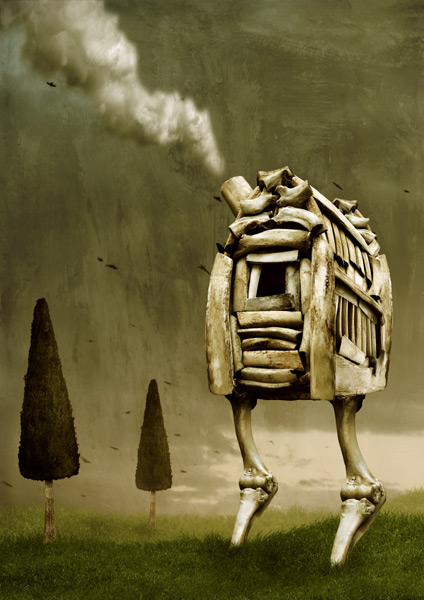
Making of "The Walking House".
A tutorial by Teodoru Badiu

Download the Source Files. Because the .psd files are to big for the Web I had to provide .jpg files for this tutorial.
The idea for this image came one day during the lunch. I had some flesh and while eating I put the bones on the table and start to play with and so I came to the idea to build a bone house, but at that time I had not enough bones so I start to collect all the bones that left after lunch for some time, until I had enough to build my house. For that I arranged the bones in the way I need and shot some Photographs of the arrangements and for the other components, some grass in front of my house, some trees in a shop, the sky and the smoke from a factory.This Tutorial was made on a PC, with Photoshop 7 but it can be done also with CS or Photoshop 6. If you are on a Mac use Cmd instead of Ctrl and Opt instead of Alt. For the shortcuts.
Step 1
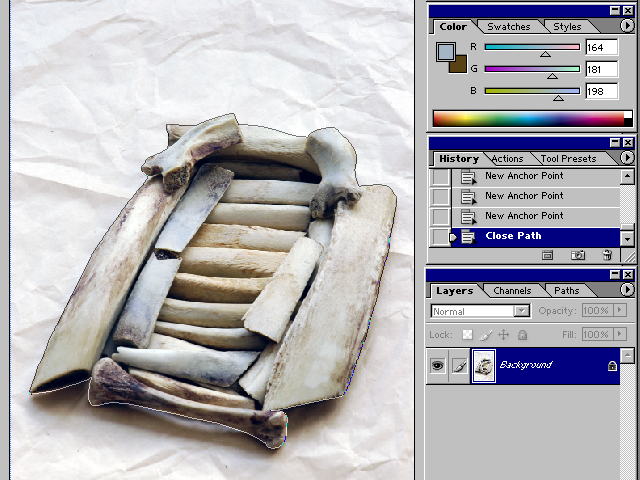
Open the wall.psd file, and use the Pen tool to draw a path around the bones, to do that zoom in as much you need to see the edge between the bones and the background better.
Image 01
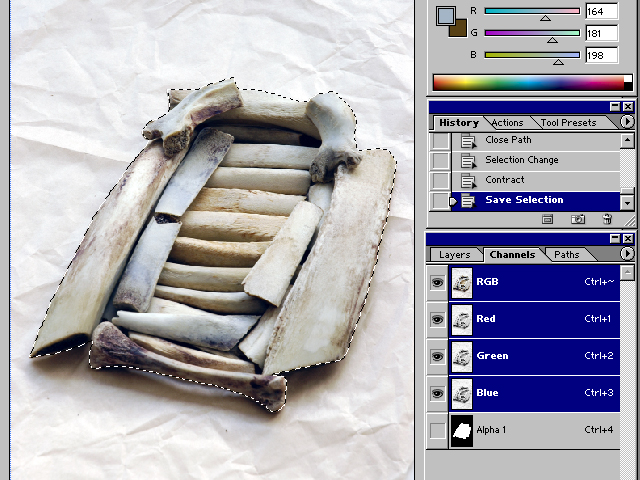
When you have close the path, Ctrl+click on first icon in the Path palette to make a selection, go back in the Layer palette and choose Select- Feather (Alt+Ctrl+D) and Feather selection with a 1 pixel radius, now change to Channels Palette and click on the Save selection as channel icon to make a new Alpha channel. Now go back to Layer Palette and choose Edit-Copy (Ctrl+C) then Save to save the wall.psd file.
Image 02
Step 2
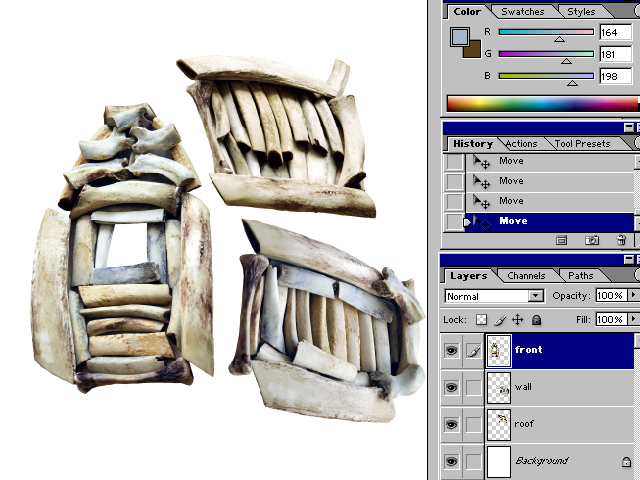
Now open a new file, File-New File (Ctrl+L) name it, Thewalkinghouse. Then from the Preset Size choose A4, 300 pixels/inch, background white and RGB Mode(or choose the size and the resolution you may want). Now go and Edit-Paste (Ctrl+V) and name the new Layer wall. Repeat the steps we did for the wall.psd file with the roof.psd and the front.psd files. After that use the Free Transform Tool (Ctrl+T) to rotate and to arange the layers like in the image 03.
Image 03
Step 3
Now use the Free Transform Tool (Ctrl+T) to Distort and to change the Perspective of all three layers, and by using the Lasso Tool cut and paste the parts that are red marked in order to have the gaps and the empty places close, repeat the steps until you have a house like the one in the image 04.
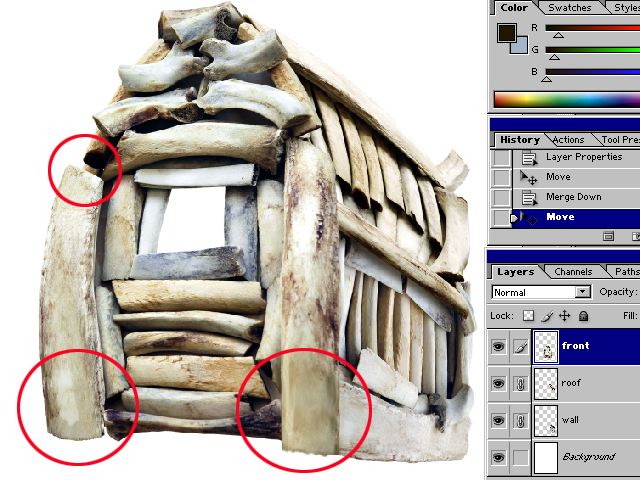
Image 04
Step 4
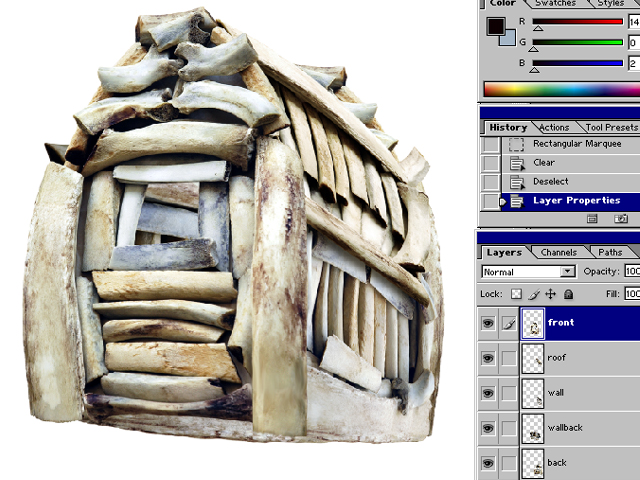
Open the wall.psd file again and go Select-Load Selection and load the Alpha1 channel. Go Edit-Save (Ctrl-C) and close the file. Change to thewalkinghouse file and Paste (Ctrl-V) name the layer wallback. Now drag the front layer in the Create a new layer Icon to duplicate the layer, name it back go to Edit-Transform-Flip horizontal and drag the layer at the bottom of the layer pallete and under the wall back layer. Now use again the Free Transform Tool (Ctrl+T) to rotate distort and add perspective like in the image 05.
Image 05
Step 5
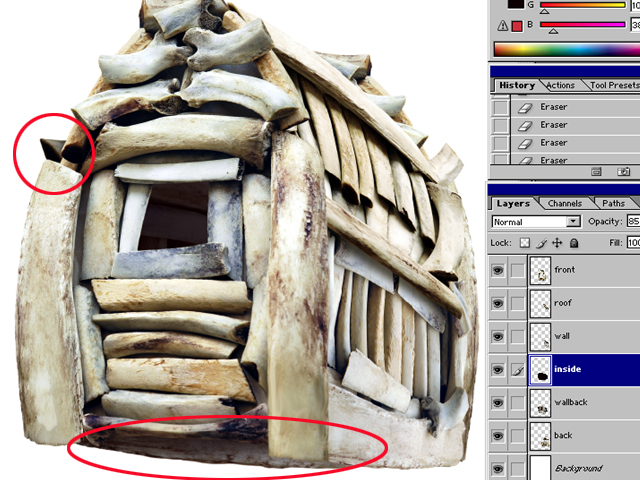
Select the "wallback" Layer and Create a new layer, name it "inside". Now Ctrl+click on the "wallback" Layer to select and go back to the inside layer and fill the selection with black.
Set the Layer opacity to 85% and then use the Erase Tool with a Round Soft Brush to erase the parts of the black colour like i did in the image 06. Save the file now to be sure you don't lose you're progress in case that something happens while you work.
Image 06
Step 6
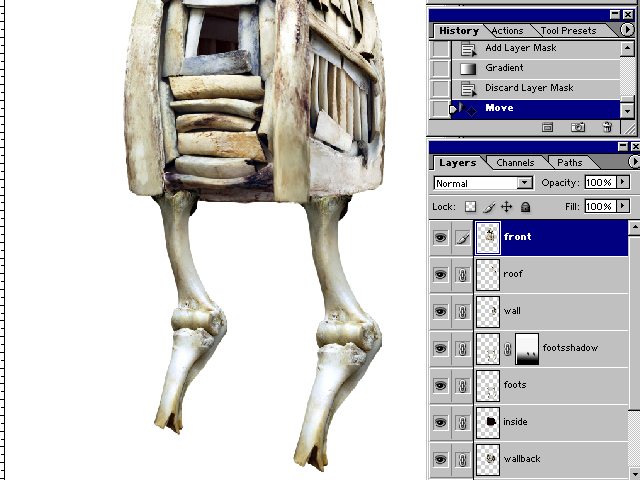
Now he have to add the legs. For that open the foot.jpg file and use the Pen Tool to cut the bone out like we done with the wall file. Save the file when you are done and Edit-Paste the foot bone in the main file and name it foot, drag the two layers under the "wall" layer, use the Free Transform Tool (Ctrl+T) to add perspective and to scale them like in the image, 07 then
Go Layer-Merge Down (Ctrl+E) and merge the two foot layer and name the layer foots, now duplicate the layer name it footsshadow and change the Blending mode to Multiply, then with the footsshadow layer selected click on the Add Layer Mask Icon in the Layer Palette,
Now press the D key select the Layer mask and with the Gradient Tool (G) drag from the bottom of the foots to the top, now use the pen tool with black colour to mask the light exposed pats off the foots like in the image07.
Image 07
After that open the chimney.psd file cut it out like we did before and use the Free Transform tool to add perspective and to distort it like in the image 08. Now add some more shadows on the foots under the house with the Burn tool(D) then link all the layers and create a New Set From Linked, and name the Set house and save the file.
Image 08
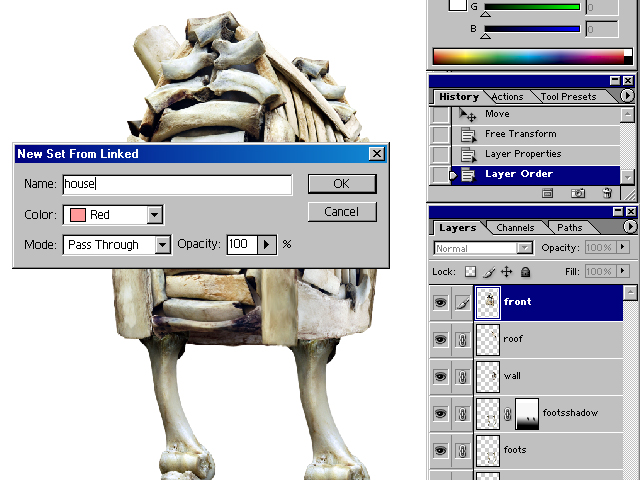
Step 7
Open the smoke.psd file, select the Magic Wand Tool(W) to select the blue colour, then go to Select-Similar to select all the blue in the photo, now go Select-Modify-Expand and Expand by 5 pixels, then go to Select-Inverse and Select-Feather and Feather by 10 pixels, with the selection active change to Channels Palette and Save Selection as Channel, go back to Layer Palette and Edit-Copy(Ctrl-C) save the smoke file, and in the main file go Edit-Paste to paste the smoke and name the layer smoke.
Go Image-Adjustments-Desaturate (Shift+Ctrl+U) to get rid of that blue shine that still remains on the edges..
Now duplicate the smoke layer and go Filter-Blur-Gaussian Blur and Blur the bottom layer with 6 pixel Radius, than set the layer opacity to 50%.change to the upper smoke copy layer ,go Select-Feather (Alt+Ctrl+D) and set a 10 pixel radius, now go Select-Inverse(Shift-Ctrl-I)
And press Return Key twice, now merge the two smoke layers and name it smoke again like in the image 09.
Image 09
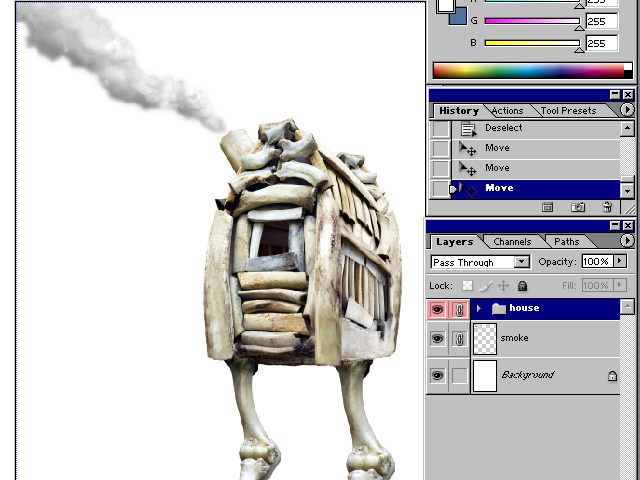
Step 8
Open the gras.psd file and drag it in the main file, under the smoke layer and position it at the bottom of the image. Do the same withe the sky.psd file, now name the two new layers, the sky and the gras layer. Now from the Gradient Tool(G) pick Linear Gradient, and add for the foreground colour a blue tone # 6F92C3 and for the background colour a pink one # E7D0C5
and fill the background using the Gradient Tool, by dragging it from top to bottom. Select the sky layer and set the Blending Mode to Multiply and the opacity to 80%.
Select the gras layer now and drag it into the Create Layer Icon to duplicate it, then go Edit-Transform and Flip Horizontal. Drag it under the gras layer and move it to the left to fill that valley, then Merge-Down the two grass layers. Now go to Edit -Transform_Distort and
then click on the upper left anchor point and drag down to distort the left part of the gras.
Now duplicate the grass layer and go Edit-Transform Flip Horizontal, now duplicate the
Grass layer once again and drag it under the second one.Now duplicate the background layer and put it between the first and the second grass layer, then set the Opacity to 60% and click on the Add Layer Mask in the Layer Palette to add a mask then use the Linear Gradient Tool
By dragging it from top to the bottom. Now we have a kind of distance fog between the grasses like in the image 10.
Image 10
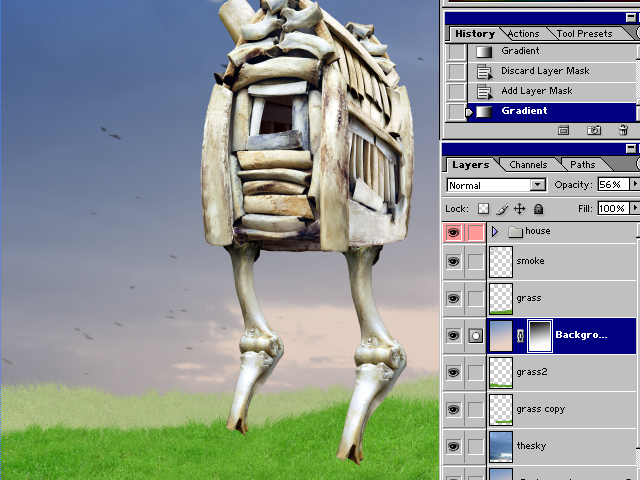
Step 9
Now get the Brush Tool(B) and choose a big soft round brush, 300 pixels, set the opacity to 20%, and mask it softly just in order to have a small difference between the second and the last gras layer.
Now select the last grass layer go to Filter-Blur-Gaussian Blur and blur it with a 3.5 pixel Radius, then do the same with the second grass layer but use just a 2 pixel Radius.
Now open the tree.psd file and the trunk.psd file and drag them into the main file (don't forget to save your progress). Scale down, the trunk, Edit-Transform-Scale to 80% and drag it under the tree layer, now create a new layer between the tree and the trunk layer and use a round soft brush with black, to add some shadow on the trunk, set the layer opacity to 90% and merge the 3 layer to have one tree layer and scale it down to 60% and drag it under the first grass layer, duplicate it now and drag the new one under the second grass layer and scale it down to 35% and use again a big brush to mask the fog layer slightly in order to mage the tree a bit more visible, like in the image.
Image 11
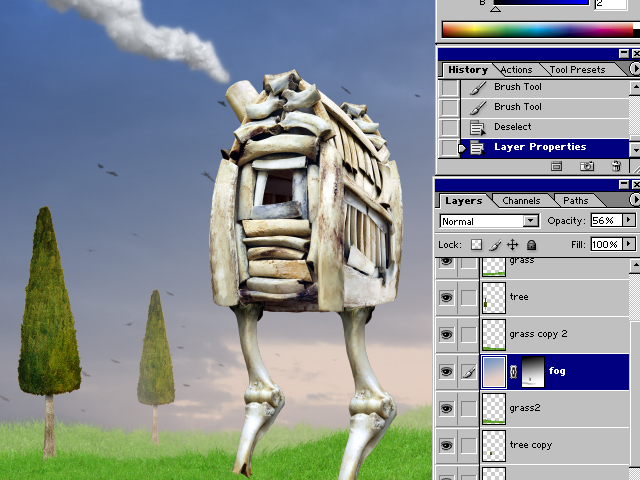
Step 10
Save your file now under a new name, then open the house layer set and link all the layer in the set then go Layer-Merge Linked then delete the layer set, choose set only from the pop up window Set Only and name the layer haus. Merge down the first tree layer and the first grass layer then drag the new layer at the top to cover the house legs. Ctrl+click on the house layer than select the top grass layer and hit Delete. Deselect now and choose the Clone Stamp Tool(S) and choose the gras brush sample, with a 260 pixel Master Diameter like in the image 12.
Image 12
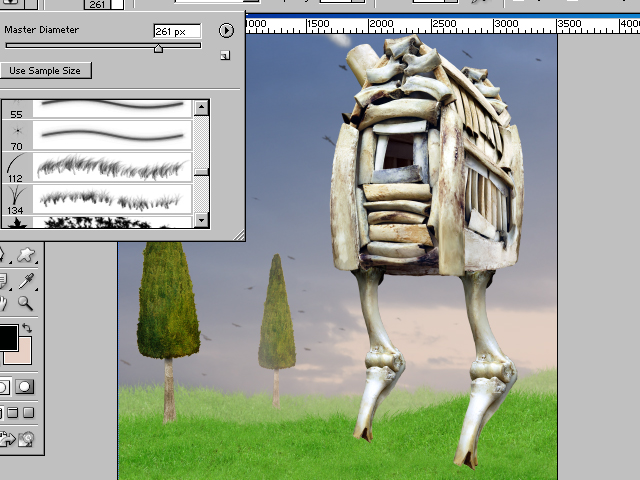
Back to the top gras layer press Alt and click in the grass layer under the bottom of the legs bones them clone the gras in order to cover the legs bottom.
Image 13
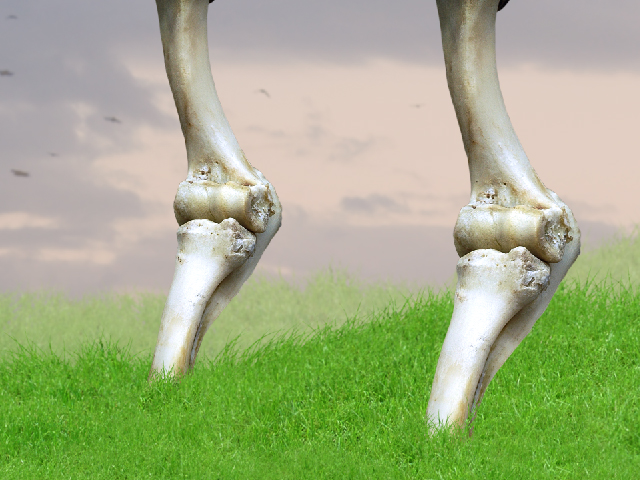
Select the Burn Tool, set the Midtone Range to 15% and by using it with a big soft Brush darken slightly the area under the haus and the trees to add some shadow, like in the image 14
Image 14

Step 11
Open the paint.psd file and Copy -Paste it in the main file ,name it paint and drag it over the sky layer.Set the Layer Blending to Soft Light and the Opacity to 70%, Flip it Horizontal then go Filter-Blur-Gaussian Blur and blur it with a 1 pixel radius.Now go Edit-Fade Blur (Shift+Ctrl+F), Mode Soft Light and Opacity to 70%. Select the Blur Tool with a Big soft Brush , Mode Normal and Strength set to 20%, blur now the top part of the smoke an the edges from half up. Now use the Dodge Tool set the Midtone to 10% Exposure and slightly dodge the right half of the trees. Save the file now.
Now go Layer-Flatten Image and save it under a new name again.
Duplicate the layer now. Select the Background Layer and go Image-Adjustments-Desaturate (Shift+Ctrl+U) then go Image-Adjustments-Hue Saturation and check Colorize, set Hue-50,
Saturation-28, Lightness-0 like in the image 15.
Image 15
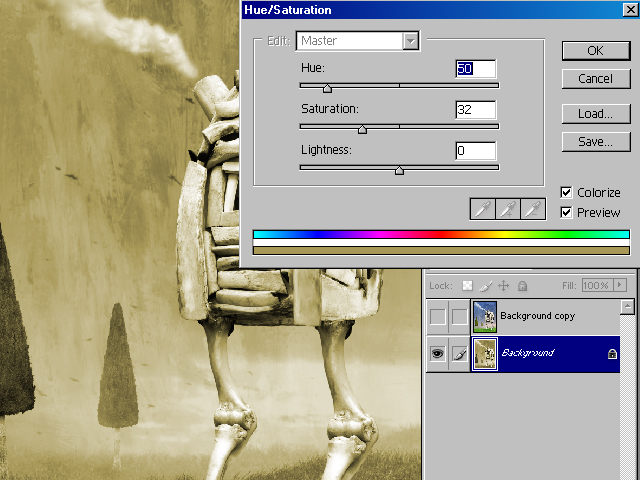
Select the Background copy layer and set the Blending Mode to Multiply and the opacity to 70%. Go Layer-Flatten Layer then to Image -Adjustments-Color Balance and use the following settings:
Midtones:Red +11, Green 0, Yellow -15,Shadows: Red +5, Green 0, Yellow -6 Highlights: Red +2, Green 0, Yellow -3.
Image 16
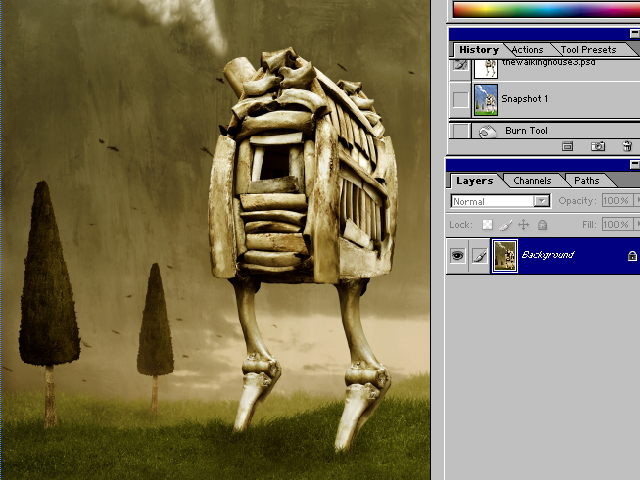
That it is, now just do some fine adjustments , use the Colour Balance to change the colours like you want, and use the Burn Tool to darken the left half of the image if you want, try to get the colour mood you want. I used the same technics, to get this final look.
Image 17
Copyright © 2011Teodoru Badiu & Apocryph.net. All rights reserved.