
Making of "Shipyard".
A tutorial by Teodoru Badiu

Download the Source Files. Because the .psd files are to big for the Web I had to provide .jpg files for this tutorial.
The idea for the image came during my visit in a Army Museum where I saw the ship model, from whom i made a few photos. Once the idea nested in my head, all i need to realize it, where the photos for the other elements. For that I took my Nikon D70 and went out to search the objects i need. Sometime to find and collect the proper photographs could take longer as the work on the image, but the time is worth. This Tutorial was made on a PC, with Photoshop 7 but it can be done also with CS or Photoshop 6. If you are on a Mac use Cmd instead of Ctrl and Opt instead of Alt for the shortcuts.
Step 1
The first step is to Knock Out the roof. Open the " roof.jpg " file you will find in the "sources" folder.
Because the contrast between roof and the sky in the image is good we will use the Magic Wand Tool (W), select the tool and click on the sky, then go Select-Similar to select the blue part of the image (imageno1).
Image 01
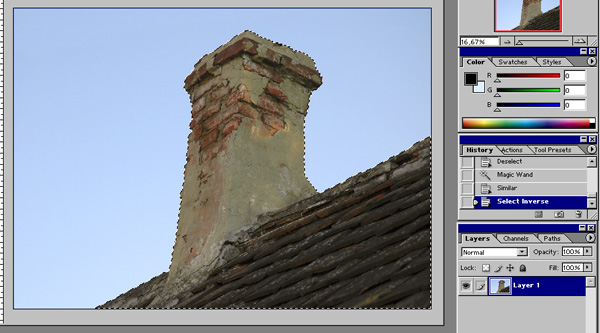
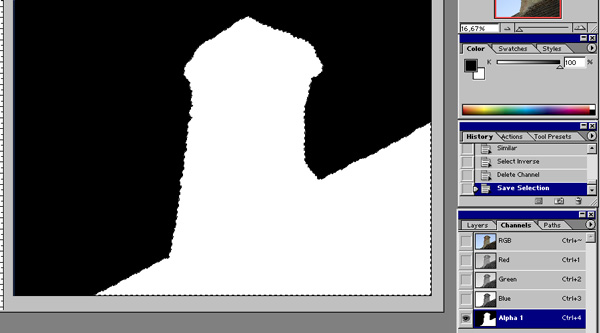
Now go Select-Inverse (Shft+Ctrl+I) to inverse the selection, go to Channel palette and click on the Save Selection as channel icon to create a new Alpha channel (imageno2).
Now go back to Layer palette and with the active selection, save the selection (Ctrl+S) then save and close the "roof.psd " file.
Image 02
Step 2
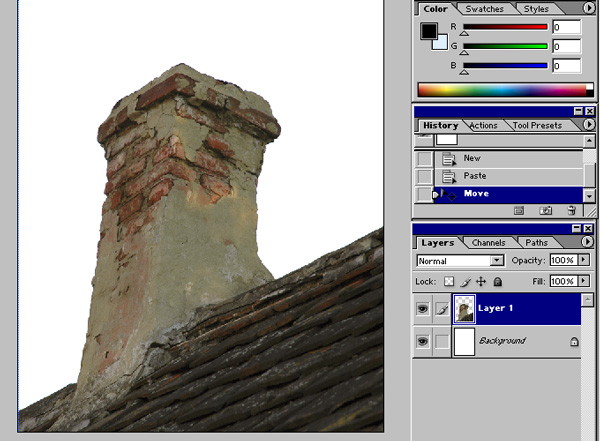
Create a new File, name it "Shipyard", set the size to A4 (or a size you can handle with, if this one is to big for your system), 300 pixels/inch, mode RGB color. Go Edit-Paste (Ctrl+V), name the layer "roof" and position the roof on the bottom of the image (imageno3), then save the file as "shipyard.psd".
Image 03
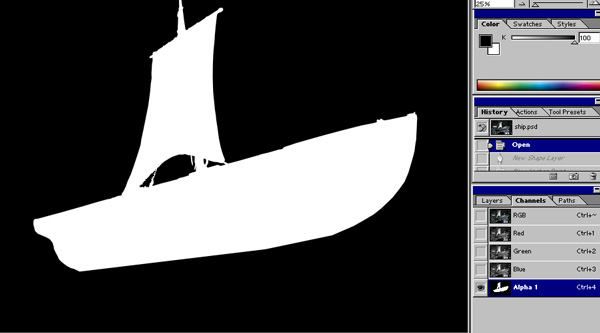
Open the "ship.psd " file from the folder "source" and use the Pen Tool (set opacity to 0 for a beeter view) to draw a path around the ship. When the path is closed go to path palette and
Ctrl-click to make a selection from it. Now like before go to Channel palette and create a new Alph chanel from selection. Repeat this steps until the whole ship is selected (imageno4).
Image 04
Like with the other image before, go back to Layer palette and with the active selection, save the selection (Ctrl+S) then save and close the "ship.psd " file.
Step 3
Open the "Shipyard.psd" file and go Edit-Paste (Ctrl+V), name the layer "ship" and drag it under the "roof" layer, with the layer selected go Edit-Transform-Rotate and rotate the ship a bit to the left to look like in the image (imageno5).
Image 05
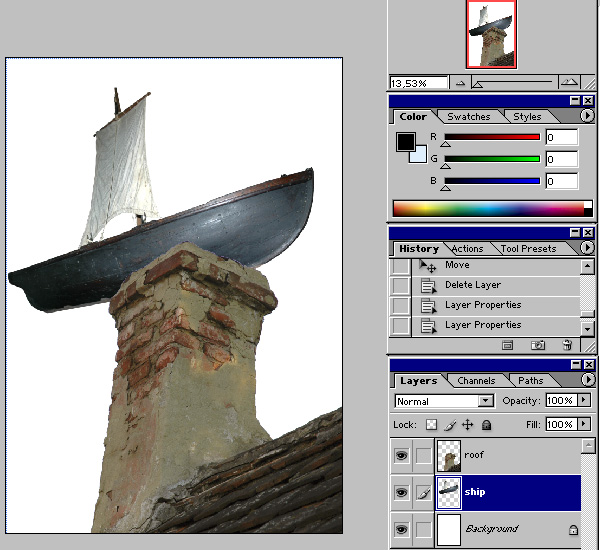
Now we have to light the front part of the roof to give it the same licht source as the ship.
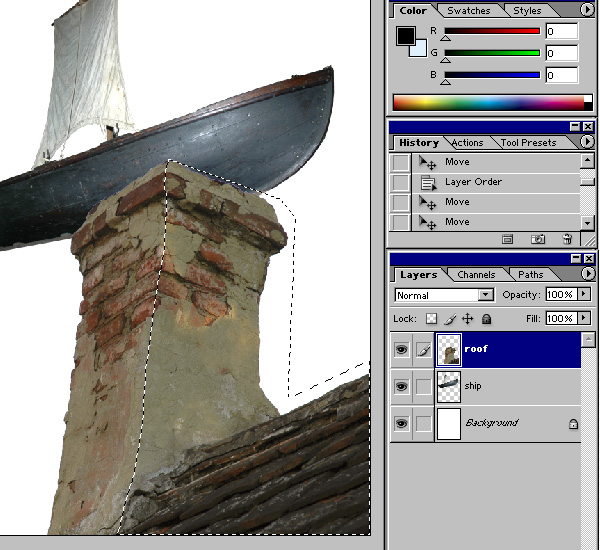
Use the Polygonal Lasso Tool to draw a selection on the roof (imageno06) now go
Select-Feather (Alt+Ctrl+D) and use a Feather Radius of 2 pixels. Copy(Ctrl+C) and Paste Into (Shift+Ctrl+V), name the new layer light, set the opacity to 70% and zoom in to be sure it fits, if not move it with the direction pads until it fits.
Image 06
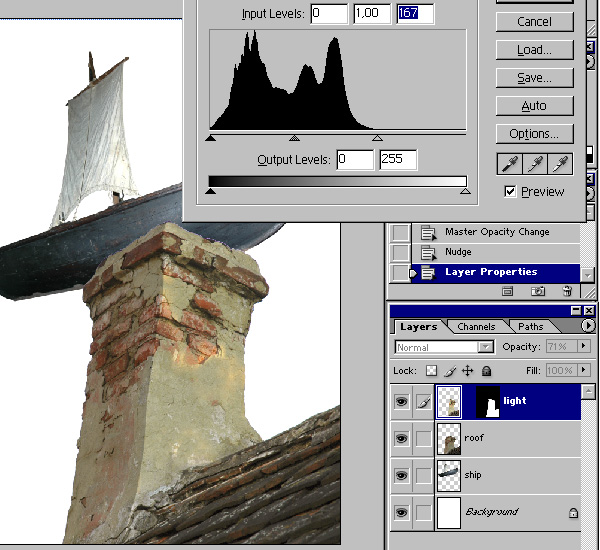
Go Image-Adjustments-Levels (Ctrl+L) and drag the right slide to the left to lighten the roof (imageno07) then link the light and the ship layer and go Layer-Merge Linked (Ctrl+E).
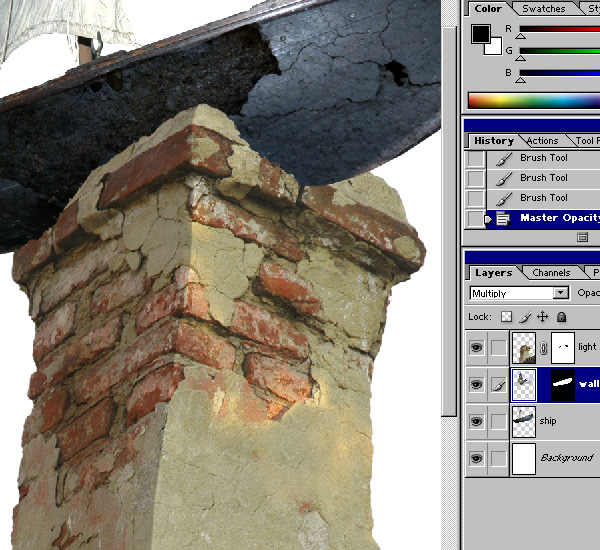
Save once again and open the file "wall.psd" fro the images folder and drag it into the shipyard.psd file under the light Layer and name it wall.
Image 07
Set the Layer Blending mode to Multiply and Edit -Transform - Rotate the layer to have it like in the image and Ctrl+click on the ship layer to activate selection. Click on the wall Layer, and Edit-Copy (Ctrl+C) and Edit-Paste Into (Shift+Ctrl+C). Use the Lasso Tool to draw a selection around the upper part of the ship click on the Layer Mask thumbnail and fill the selection with black.
Ctrl+click ship layer to load selection then select the Clone Stamp Tool , with a round brush (65 px) and press Alt and click on the bottom of the ship and clone out that wood part that don't belongs to the ship (imageno09).
Image 08
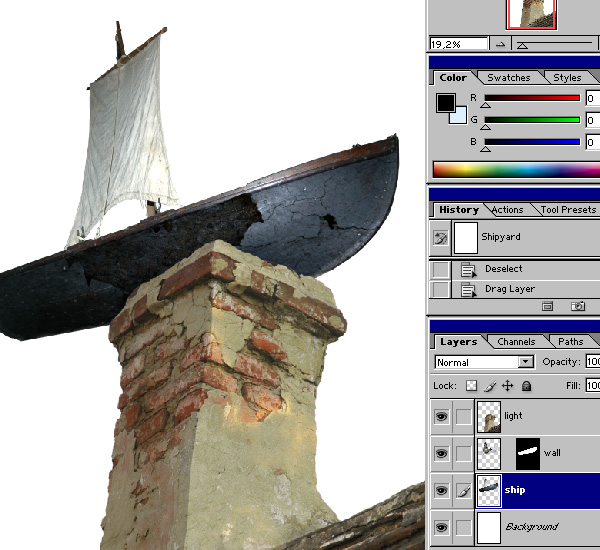
Select the light layer and click on the Add Layer Mask icon, be sure that you are on the Layer mask, select a round Brush and use black to paint out the parts where the ship collides with the roof. After that save the file again (imageno09).
Image 09
Step 4
Open the chain.psd file from the images folder and use the Pen tool to draw a path around the chain. Like in the other cases make a selection from the Path and save it as Alpha channel(imageno10).
Image 10
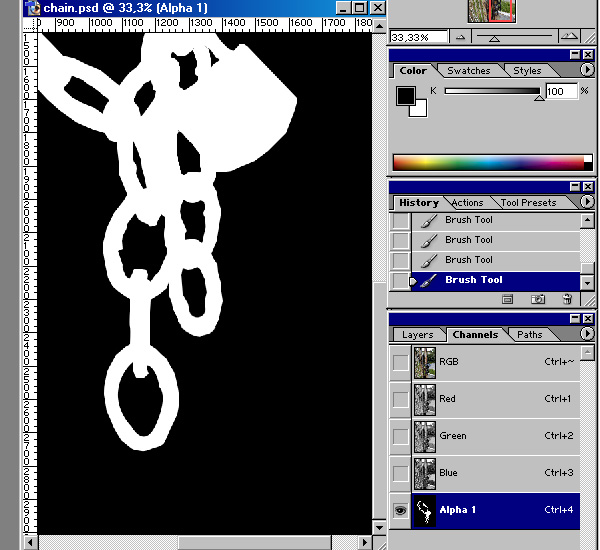
Then go Select- Load - Selection and choose Alpha 1 to select the chain, go Select-Feather and set the Feather Radius to 1 pixel then Edit - Copy (Ctrl+C) to copy the chain selection.
Save and close the chain.psd file and go back to the Shipyard.psd file.
Edit-Paste (Ctrl+V) and name the new layer chain. With the chain layer selected go to Edit-Transform-Scale (Ctrl+T) and by pressing Shift scale the chain a bit, now use the Rectangle
Tool (M) to make a selection on the last upper two chain link Edit-Copy (Ctrl+C) and Paste (Ctrl+V) name the new layer link, then go Edit-Transform-Flip Horizontal and drag it under the ship layer.
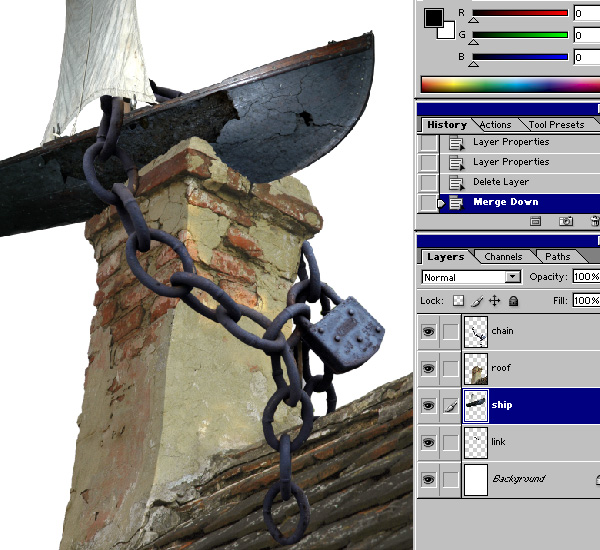
Select the chain layer again and add a Layer Mask and use a Round brush to mask out the part of the chain that is covered by the ship and the roof, using the Layer Mask is great because you can try a lot until you have the desire result, you just have to change between black and white to add or to subtract part from the chain. When you are happy with it click on the Create New Layer icon ,drag the layer under the chain layer,select the chain layer again and go Layer + Merge Down (Ctrl+E) name it again chain, now do the same with the roof layer but name it roof. Also Merge Down (Ctrl+E) the wall layer with the ship layer.
Change to the link layer and arrange the two chain link behind the ship to look believable (imageno11).
Image 11
Step 5
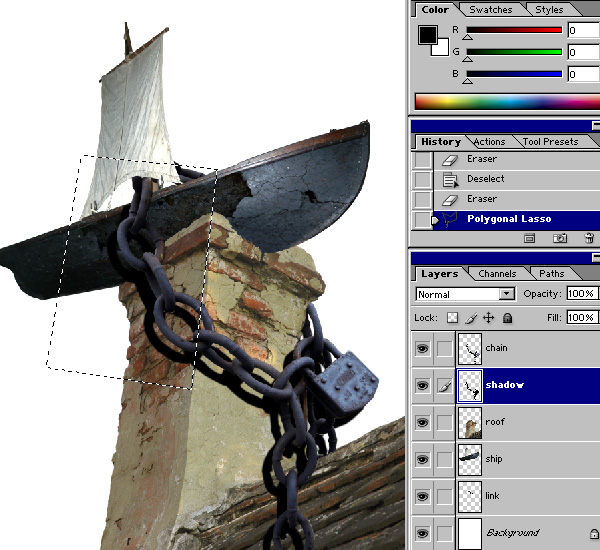
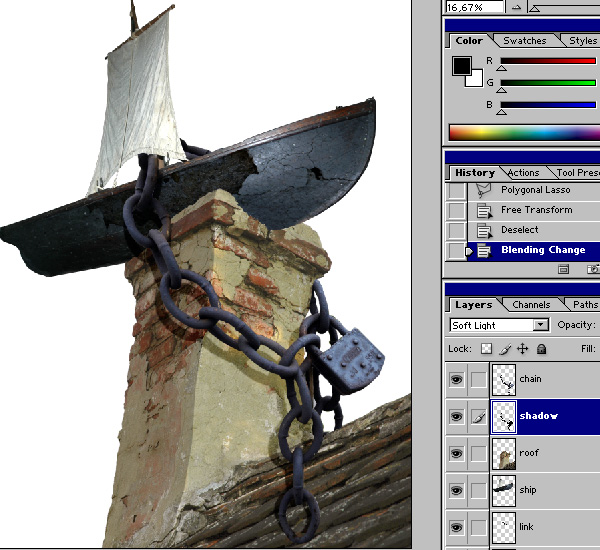
Now we have to set some shadows. To do that Create a New Layer (Shift+Alt+N) name it shadow and place it under the chain layer. Now activate the chain layer and Ctrl+click to Load Selection, change to shadow layer now and go Edit-Fill (Shit+F5) to fill the selection with black. Use the Arrow keys to move the shadow down and left a bit and then go Filter-Blur-Gausian Blur and use a 2.5 pixel Radius and then use the Erase Tool (E) to get rid of the shadow under the sail.
With the Polygonal Lasso Tool (L) make a rectangular selection around the shadow that lies in the dark area of the roof(imageno12) with the selection still active go Edit - Transform - Distort to move the shadow under the chain.
Image 12
Now using the same technics move the bottom part of shadow, on the roof under the chain and set the Layer Blending Mode to Soft Light (imageno13).
Image 13
Step 6
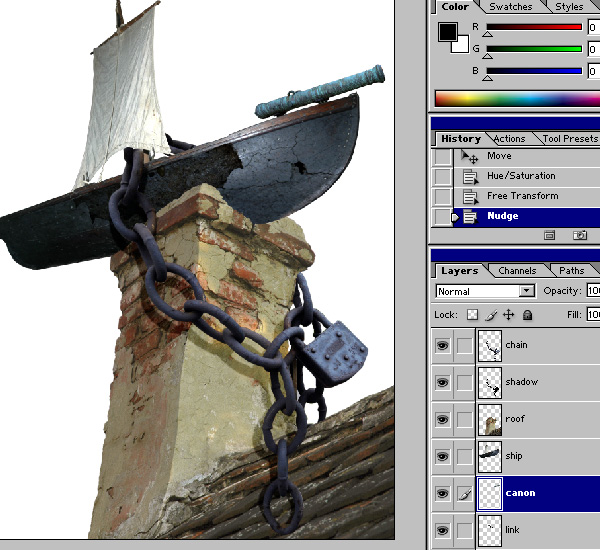
For the next step open the canon .psd file on the images folder and use the Pen Tool (P) to cut out the canon and to make an Alpha Channel from the selection like we did for the roof and the ship. Once you done that go Edit-Copy (Ctrl+C) and save and close the canon.psd file.
Go back to the shipyard file and Edit-Paste(Ctrl+V), place the new layer under the ship layer and name it canon.Go Edit - Transform - Scale and Rotate to position the canon like in the image (image14).
Image 14
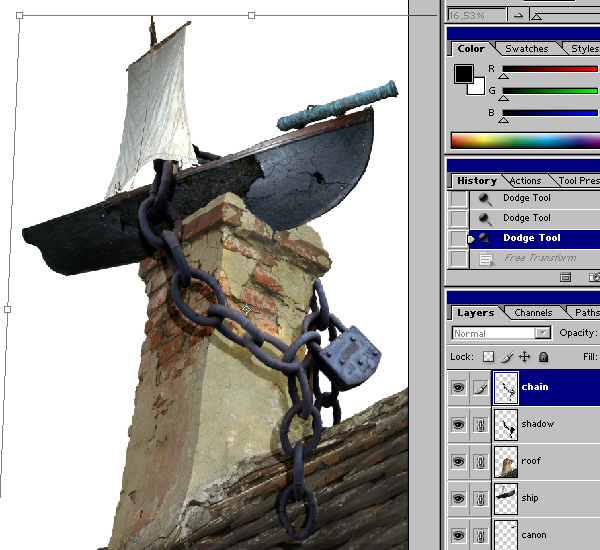
Now use the Dodge Tool(D) with a big Round soft brush, Midtones - Exposure 20% to lighten a bit the chain whre the light falls on and the Burn Tool(O) Midtones - Exposure 20% to darken the chain on the bottom and on the dark side of the roof, and the ship part where it collides with the roof.
Select the chain layer and then link all the layers, go Edit - Transform - Perspective and by pressing Shift slightly drag the upper felt corner to the right and the the middle point to the right, like in the image (imageno15).
Image 15
Step 7
Before we go further is very important to save your file twice, once under the current name, and the second time under a different one, I name my second one merged shipyard.psd
This one we will be our work file now.
Set background invisible layer the chain layer and go Layer-Merge Visible(Shift+Ctrl+E) name the layer roof, go Select-
Load - Selection (Ctrl+click) press the X key and in the Channel Pallete click on the Save Selection as Channel icon.
Go back in the Layer modus and open the sky.psd file from on the images folder.
Copy and Paste or drag the image in your document under the roof layer and name it sky.
Now scale the sky layer to fit and go Filter-Blur-Gausian -Blur and set a Radius of 3 pixel.
Duplicate the sky layer by dragging it in the Create new Layer icon, place the new layer under the sky layer and name it skyhue.
Go Image_Adjustments-Hue/Saturation (Ctrl+U) check the colorize box and set
Hue - 54, Saturation-30, Lightness-0
Select the sky layer and blending mode to Soft Light and the Opacity to 50%.
Now we do the same with the roof layer.
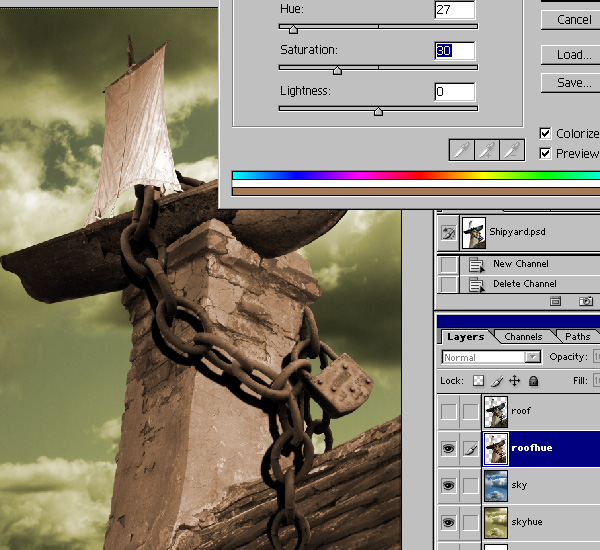
Duplicate it, name the new one roof hue and place it under the roof layer.
Go Image-Adjustments-Hue/Saturation (Ctrl+U) check the colorize box and set
Hue-50, Saturation-30, Lightness-0 (imageno16).
Select the roof layer and set the Blending mode to Hard Light and the opacity to 70%.
Image 16
Step 8
Open the texture.psd (I made that texture using a scanned, scratched plastic sheet ) file on the images folder, drag it in your document under the roofhue layer name it texture and set the Blending Mode to Soft Light.
Open the paint.psd (for this one i scanned a painted cardboard) file now from the same folder, name it paint and place it under the roof hue layer. Set the Blending Mode to Multiply.
Click on the sky hue layer to have it active and click on the Create new fill or adjustment layer icon in the Layer palette. Select Level and darken the sky hue a bit more like in the image (image17).
Image 17
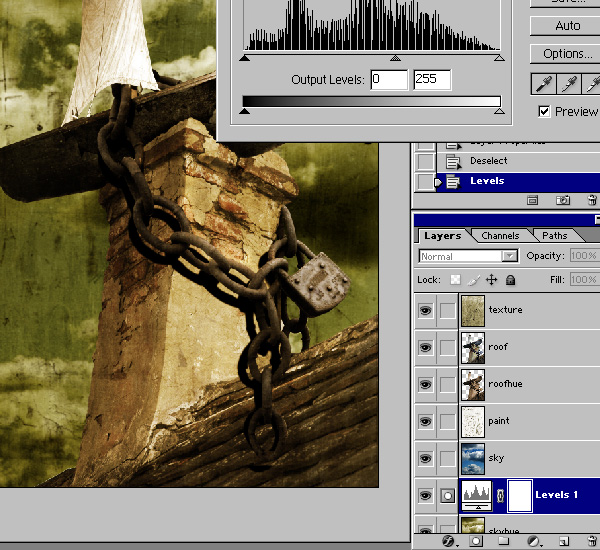
Add a new layer, place it under the Levels1 layer and use the Gradient Tool(G) with a Foreground to Transparent preset change the color to a dark brown #312901 like in the image(imageno18) and with drag to fill the layer from left bottom to right after that set the opacity to 90% and Blending mode to Multiply in order to darken the left bottom part of the background.
Image 18
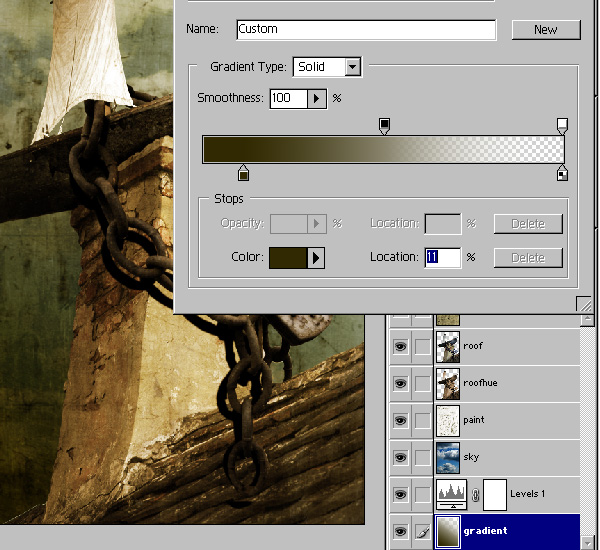
We are now almost done. At this point you should do some cleaning and retouch work, zoom in and see if the margins are clean, add shadows were is the need using the Burn Tool, or highlits with the Dodge Tool, use the Blur Tool(R) with a small Strength to blur areas a bit (the back of the ship for example) or the Sharpen Tool to sharpen parts like the Lock for example.
Step 9
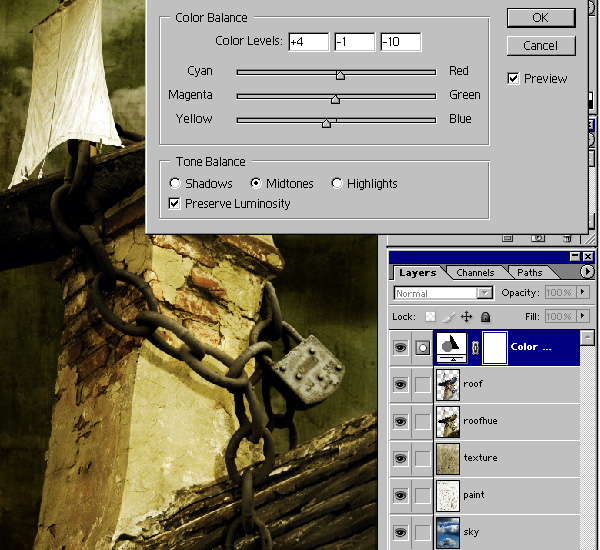
When all that work is done select the roof layer and click Create new fill or adjustment layer icon in the Layer palette. Select Color Balance and use the Following settings for the Midtones: Red: +4, Magenta: -1, Yellow: -10,
Shadows: Cyan: -3, Green: +2, Blue: +3, Highlits: Red: +5, Magenta: -5, Yellow: -15 (imageno19).
Image 19
After you've don all this select the texture layer and drag it on the Create Layer Icon in the Layer palette to duplicate it. Place it over the Color Balance layer and set the opacity to 70%.
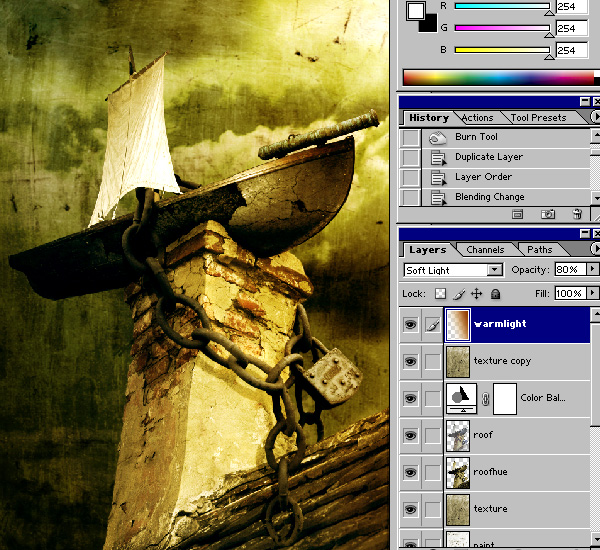
Now we have to set a new Alpha channel, for Ctrl+click on the roofhue layer then change to the Channel palette and delete the Alpha 1 channel, press X and click on the Create selection as channel icon to make a new one. Go back to layer palette now and add anew layer on the top, name it warmlight. Now use the Gradient tool with a Foreground to transparent Gradient Type and choose a orange color
#C07B03 for the foreground. Then set a gradient from right top to left bottom (imageno20).
Image 20
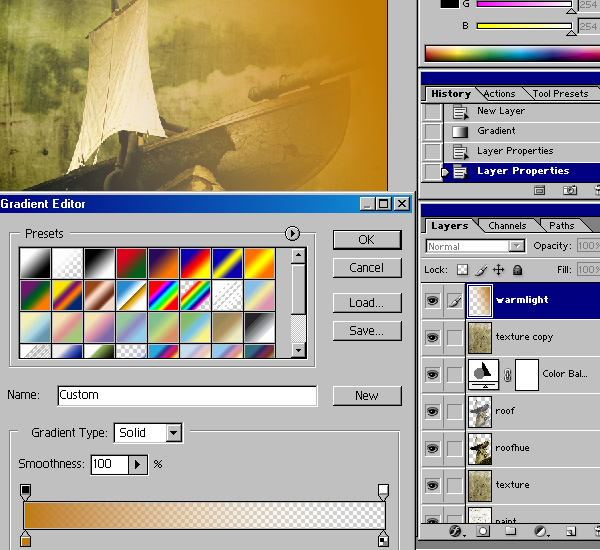
Set the layer Blending to Soft Light and the Opacity to 80% and go to
Filter-Blur-Blur More to blur the color. Now go Edit-Fade Blur (Shift+Ctrl+F) set Opacity to 80% and Mode to Multiply.That's it. We have the image and the mood I want to reach (imageno21).
Image 21
Save your .psd file now. Of course from this point on you could experiment more, trying to change the mood using other hues and Color setting, you can add more gradient layers to darken the left part more and warm the right part and so on.
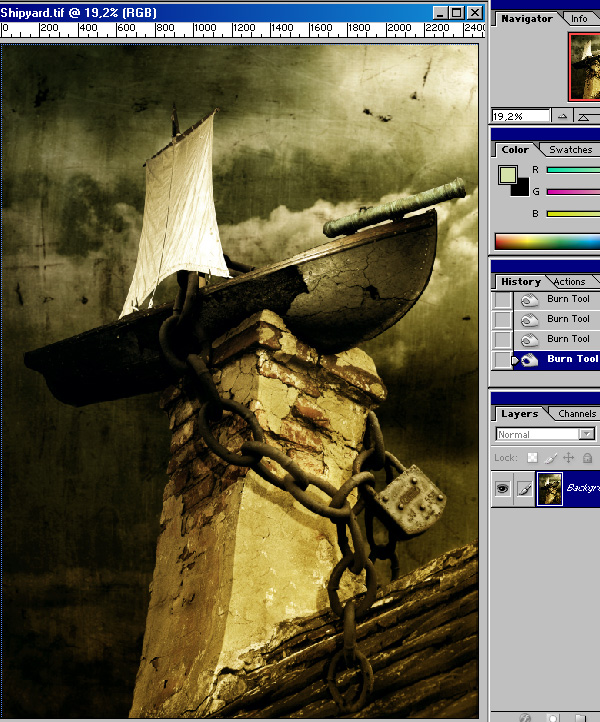
I always save a .tif file after that in another folder to have the final image for the case I need it, and to have a backup of the file (imageno22).
Image 22
Copyright © 2011 Teodoru Badiu & Apocryph.net. All rights reserved.