
Making of "Atlas".
A tutorial by Teodoru Badiu

Download the Source Files. Because the .psd files are to big for the Web I had to provide .jpg files for this tutorial.
This Tutorial was made on a PC, with Photoshop 7 but it can be also done with Photoshop CS or Photoshop CS2. If you are on a Mac use Cmd instead of Ctrl and Opt instead of Alt. for the shortcuts.
Step 1
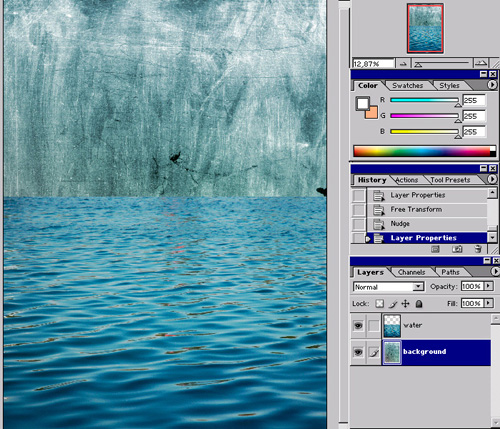
Open the texture.psd file from the source folder double click on the layer1 and name it background then go File-Save as (Shift+Ctrl+S) and save the file as atlas.psd in the folder you wish to. Now go back to source folder and open the water.psd file, drag and drop the water image into the atlas file and close the water file. Name the new layer water and go to Edit-Free Transform (Ctrl+T) and by holding down the Shift key resize the water in order to cover about a half of the background, now go and open the sky1.psd file and repeat the steps we done with the water, now you must have something like in the Image 01:
Image 01
Step 2
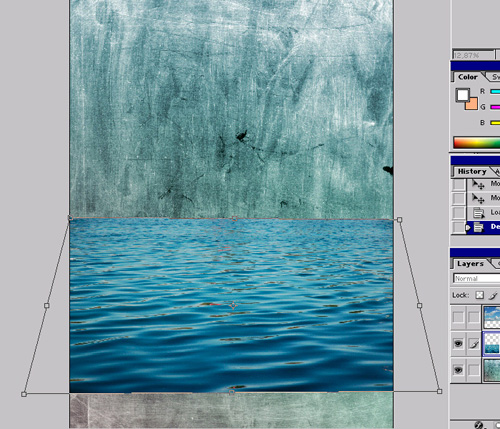
Select the water layer and go to Edit-Transform-Distort now we try to add perspective using this tool, squash the height a bit then wide the bottom and scale down the upper part of the water image like in the Image 02:
Image 02
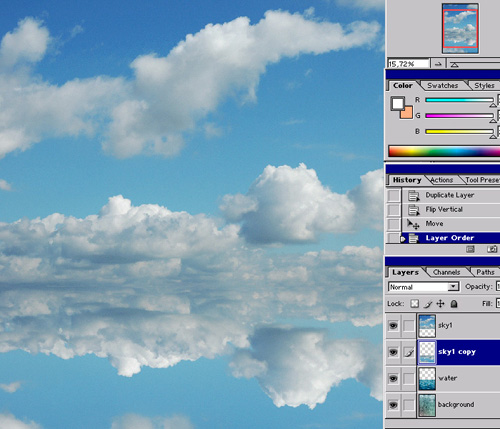
Now we will add some sky reflections in the water. Select the sky1 layer and drag it into the Create new layer icon to make a copy then go Edit-Transform-Flip Vertical then drag it down and place it under the sky1 layer and arrange it like in the Image 03 then Set the blending mode for the layer to Soft Light.
Image 03
We want to get rid of the orange reflections in the water now. To do that select the water layer and go to Image-Adjustment-Hue/Saturation(Ctrl+U), check on the Colorize box and set the Hue to 209, the Saturation to 30 and let the Lightness to 0.Now we have a nice clean water to work with.
Step 3
It is time to create a Horizon. Select the sky1layer and click on the Add layer mask icon at the bottom of the layer palette, now select the Gradient tool (G) and choose a Linear gradient, Black-White and make a graduation at the bottom of the sky1 layer, if you press the shift key while using the Gradient tool you ensure that it stays perpendicular. Now you should have something like in the Image 04:
Image 04
Step 4
Now the water and the sky blend together but we need to have a subtile horizon where the two layers meet. create a new layer above the sky1 layer name it mist then go and select the Rectangular Marquee Tool (M) and make a rectangular selection and fill it with a # 93A5B1blue-gray color, and go to Filter-Blur-Gaussian Blur and blur the mist layer with a 10px Radius, Image 05
Image 05
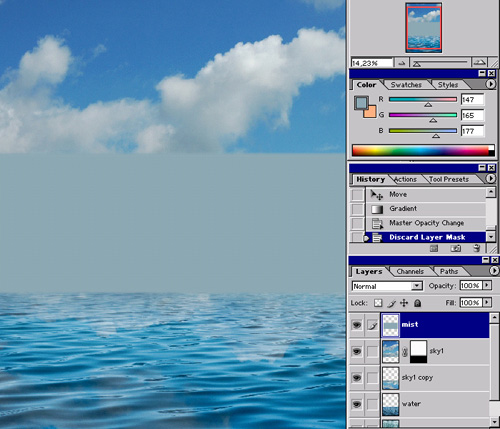
Step 5
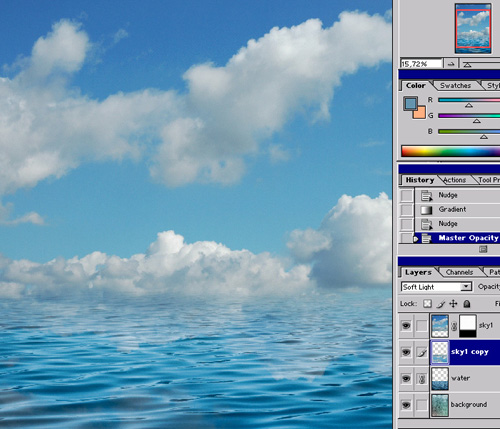
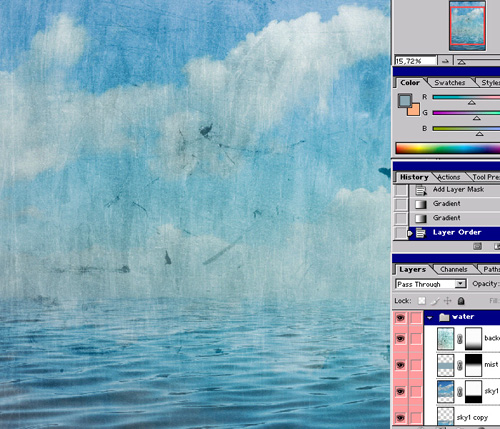
Now add a Layer mask select the Gradient tool (G) and choose a Linear gradient, Black-White and make a graduation from the upper edge of the mist selection to the centre after that set the master Opacity for the mist layer to 80% and the sky1copy Opacity to 70%. Now go to Select-All (Ctrl+A) and go to Image-Crop. We do this to get rid of the image parts that we don't need. Select the mist layer now and link all the layer but not the background layer. Go Layer-New-Layer Set From Linked to create a Set name it water and choose a color if you want.Select the set layer and reduce the Opacity to 80% then make a background copy place it above the set and change the blending mode for the layer to Soft light, go to Filter-Blur-Blur More then Edit-Fade Blur More [Shift+Ctrl+F] set Opacity to 100% and Mode to Screen then click OK.
Now add a Layer mask to the new layer and select the Gradient tool (G) and choose a Linear gradient, Black-White and make a graduation from the bottom to the center, open the water set and drag the layer in the set.
Don't forget to save your progress. You must have a image that looks like the Image 06 now.
Image 06
Step 6
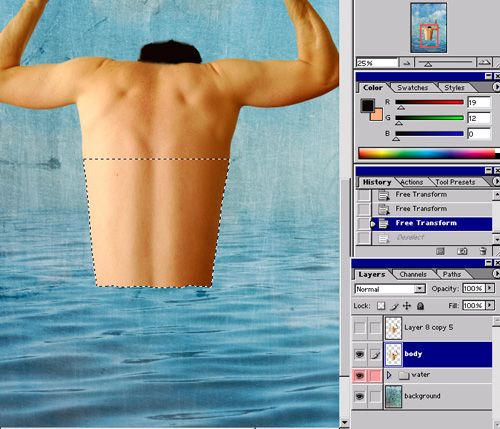
Open the body.psd file now. To speed up the process i have already cut out the image using the PenTool (P) and create a Alpha Channel from the Path selection. To load the selection go to Select-Load-Selection, Alpha1 then Edit-Copy(Ctrl+C). Close the image now and Paste(Ctrl+V) the selection in the atlas file and name the layer body.
Ctrl+Click on the body layer to load the selection and go Select-Modify Contract with a 1px radius and then go Select-Feather(Alt+Ctrl+D) set a 1px Feather Radius go Select-Inverse (Shift+Ctrl+I) and hit Delete once. Using the Clone Stamp Tool(S), Eraser Tool (E) and the Zoom Tool (Z) clean up and retouch the body. Now select the Rectangular Marquee Tool (M) and draw a selection on the bottom part of the body and go and use Edit-Transform-Scale and Edit -Transform-Distort to make a longer body like in the Image 07:
Image 07
Step 7
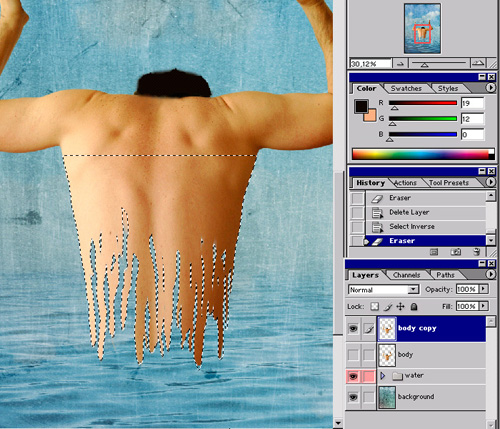
Create a copy of the body layer and click on the Eye Icon in the Layer Palette to turn the Visibility off. We want to make the skin looking like it was washed up and weatherbeaten and for that we will use the Lasso Tool (L) to create a selection like in the Image 08.
Image 08

Now go to Select-Inverse(Shift+Ctrl+I) and using the Eraser Toll with a Big Soft Round Brush clean up the body parts that are out of selection like in the Image 09.
Image 09
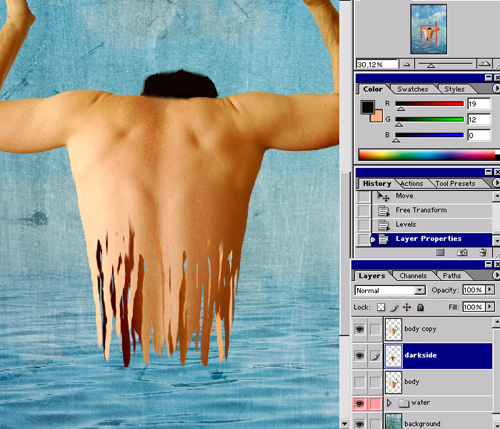
With the Rectangular Marquee Tool (M) draw a selection around the bottom part of the body under the arms Copy and Paste name the new layer darkside, then go Edit-Transform-Flip Horizontal and using the Free Transform Tool (Ctrl+T) scale it tin order to be covered by the body copy layer and go to Image-Adjustment-Levels (Ctrl+L)
and drag the left side slider to the right to darken the image a bit. Save your progress. You should have a image like the Image 10.
Image 10
Step 8
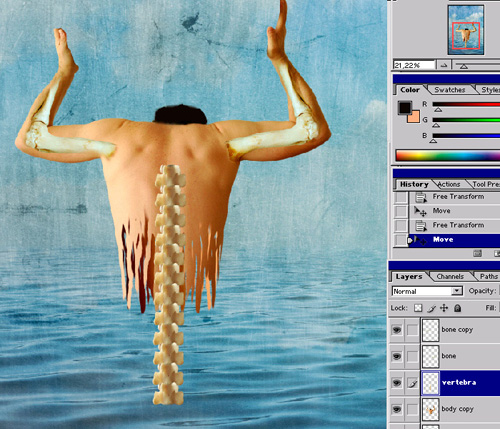
Open the vertebra.psd image and drag it into the atlas file then name the layer vertebra, next step is to open the bone.psd file and drag it into the atlas file to and name the layer bone. Now use the Free Transform Tool(Shift+T) to scale down and to rotate the bone in order to make it fit in the arm and use the Eraser Tool (E) to clean the parts that we don't need. Now duplicate the layer and flip it horizontal in order to make it fit in the oder arm. Now select the vertebra layer and go to Image-Adjustments-Saturation and drag the Saturation slider to -30.Now the image must look like in the Image11.
Image 11

Step 9
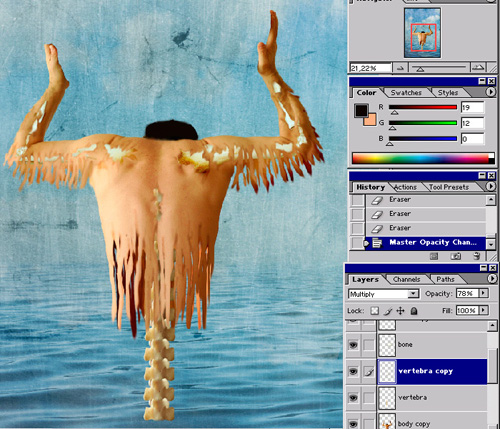
Select the vertebra layer now and make a copy of it and move the copy upside like in the image12
Image 12

Select the vertebra layer again and Ctrl+click to select it, with the selection active click on the vertebra copy to select it and use the Eraser Tool (E) to erase the parts that cover the front side of the vertebra layer. Merge the two vertebra layers together then make a copy of the new layer and then repeat the steps we made with the first two vertebra layers, then merge the two layers again and repeat the procedure two times, after that scale down the vertebra layer like in the Image 13.
Image 13
Step 10
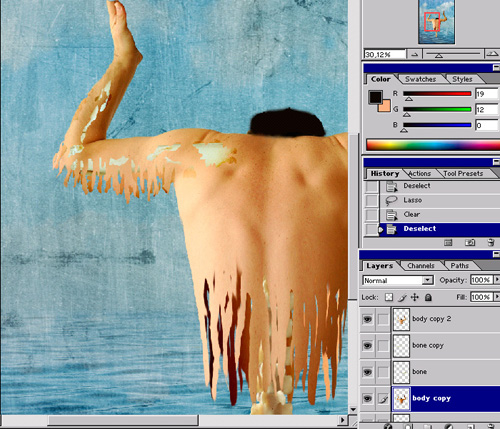
We now have to give the arms the same weatherbeaten look that the body has. First duplicate the body copy layer and drag the new layer above the bones layers. Now zoom in on the left arm for that and using the Rectangular Marquee Tool (M) draw a selection around the bottom part of the arm, then go to Free Transform(Ctrl+T) and scale up the bottom part of the arm. Now use the Lasso Tool (L) to draw a selection like we did for the body and also make a few holes on the arm so that the bones can be seen.
Now go to the body copy layer and go Image-Adjustments-Levels(Ctrl+L) and drag the left slide to the right a bit to darken the layer, after that use the Rectangular Marquee Tool (M) and the Lasso Tool to create the same look we made for the previous layer. If everything is ok you should have something that looks like the Image 14.
Image 14
Step 11
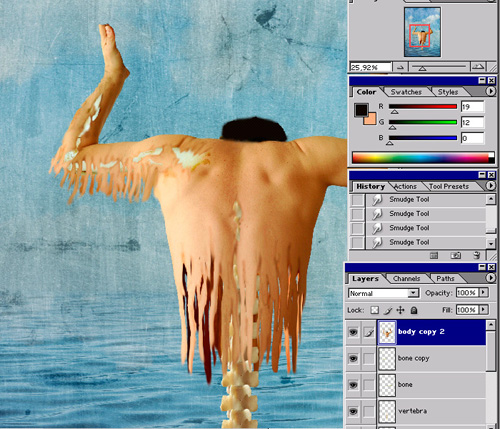
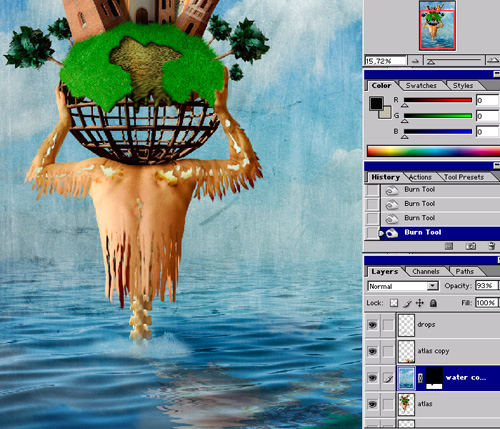
Now Select the Burn Tool (O) and choose a Soft Round brush with a radius 17px radius and the Midtones Exposure set to 20% and use it to slightly darken the edges of the holes and of the cuts we just make ,do the same with the body cuts. When you are done select the Smudge Tool (R) with a big Soft Round Brush and the Strength set to 50% and work out the cuts we made in the skin on the both body layers until you have a Image that look like the Image 15, then repeat the steps we've done on the right arm.
Image 15
Step 12
And one last step is to duplicate the vertebra layer and to set the blending mode of the copy to Multiply and the Opacity to 70% then using the Eraser Tool (E) erase the left part of the spinal cord to let it look like it is lighten from the left. Save your progress.
Image 16
Step 13
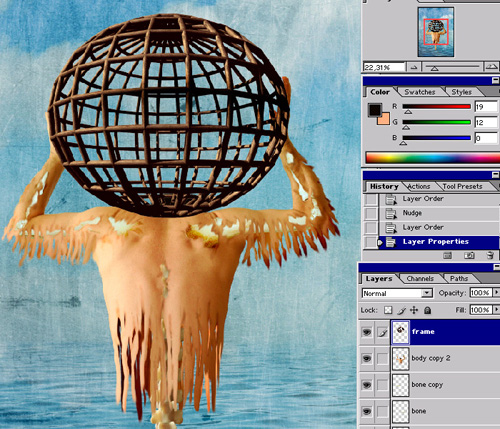
Open the woodframe.psd image from the source folder and drag it into the main document and place it to be the first layer then name it frame. Now Use the Free Transform Tool(Ctrl+T) to scale it down and place it between the hand like in the Image 17.
Image 17
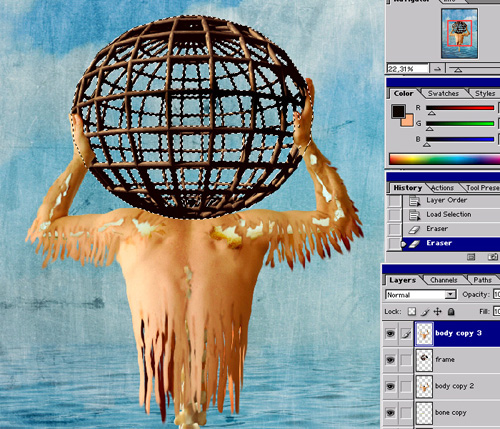
Now duplicate the body copy2 layer and drag it above the frame layer, then select the Eraser Tool (E) and then Ctrl+click om the frame layer to load the selection. Now change to the new body layer and erase the parts of the body that cover the frame ( but not the hands).
Image 18
Step 14
We have to add a few shadows on the body now. Select the Burn Tool (O) with a soft Round Brush and the Midtones Exposure set to 30% and add some shadows on the edge where the body meets the frame
And also some shadows on the right arm to make it look like the are drop by the frame. After that use the Smudge Tool (R) to work the left hand out and make it look like it should. A last step to do is to select the Blur Tool (R) and slightly blur the edge where the frame meets the body then to feather the frame with a 1px radius Invert and hit delete once.
Image 19

Step 15
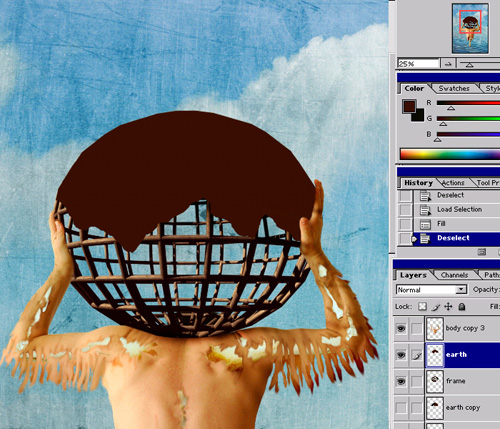
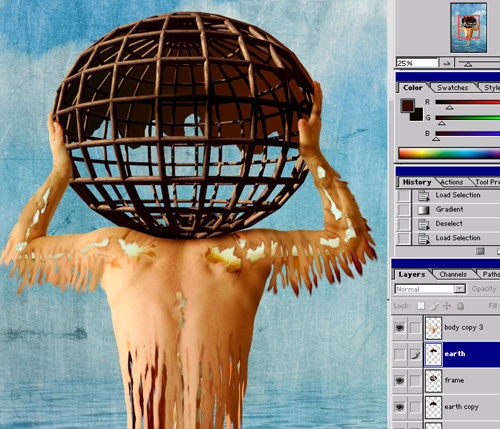
Create a new layer name it earth and use the the Rectangular Marquee Tool (M) draw a selection
on the upper part of the frame and fill it with a dark brown color. Now use the Lasso Tool to draw and cut out a kind of continent looking selection like in the Image 20.
Image 20
Now repeat the steps we done on a new layer that will be placed under the frame layer to create the back part of the earth, but make it a bit different and use the Gradient Tool (G) and fill from black to broun like in the Image 21.
Image 21
Step 16
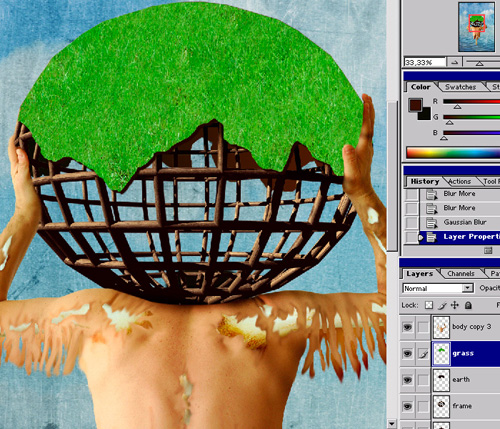
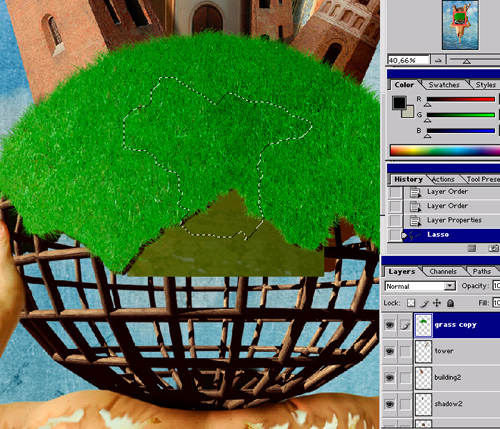
Open the gras.psd file and drag it into the main file then name the layer grass. Now scale it up a bit to cover the earth selection the Ctrl+click on the earth layer to load the selection go Select-Inverse (Shift+Ctrl+I) and change to the grass layer and hit delete. Now back to the earth layer use the down and the right arrow keys to nudge the earth down and to the right, then use the Eraser Tool (E) and erase the parts of the earth layer that show out on the right side of the grass. Now with Filter Blur-More Blur and blur the earth end the earth copy layer.
Image 22
Step 17
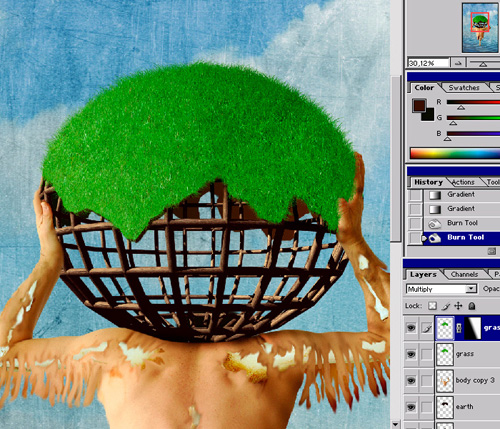
Now drag the grass layer over the body copy 3 layer then Ctrl+click on the body copy3 layer to load the selection go back on the grass layer and hit delete. Select the Clone Stamp Tool (S) and the Grass brush from the Brush Preset picker, set the Master Diameter to 80% and start to clone grass on the upper edge of the grass layer. To get the best results change between the Dune Grass and the Grass Brush also use
Different brush sizes and opacity and flip the gras layer horizontal and vertical to get the best result.After that duplicate the grass layer and set the blending mode of the new layer to Multiply, reduce the Opacity to 60% add a layer mask and using the Gradient Tool (G) choose a Linear gradient, Black-White and make a graduation from left to right.
When you are done you should have a image that looks like the Image 23.
Image 23
Step 18
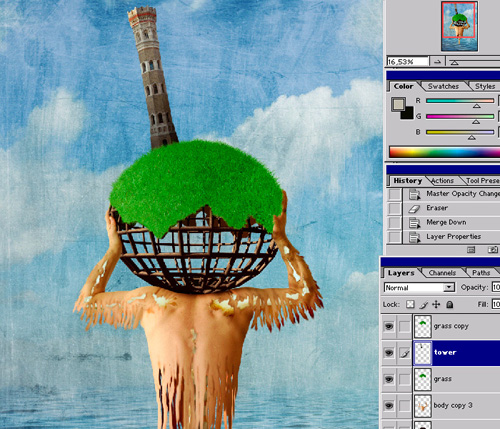
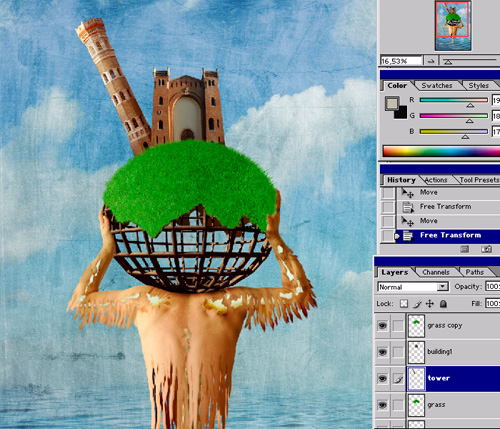
Open the tower.psd go to Select-Load-Selection, Alpha1 then Edit-Copy(Ctrl+C). Close the image now and Paste(Ctrl+V) the selection in the atlas file and name the layer tower. Scale down the tower and cut out the cars at the bottom and use the Clone Stamp Tool to clone out the shield and the text at the bottom of the tower.Now merge the two gras layer together and made a copy of the new gras layer. You mast have a image like Image 24.
Image 24
Make a tower copy and set the blending mode of the new layer to Screen than use the Eraser Tool (E) to erase the right part of the tower. Go to Image-Adjustments-Hue/Saturation and drag the Saturation slider to +15. Now go Image-Adjustments Color Balance and adjust the Midtones, Cyan +20, Magenta -14, Yellow -13.
Image 25
Step 19
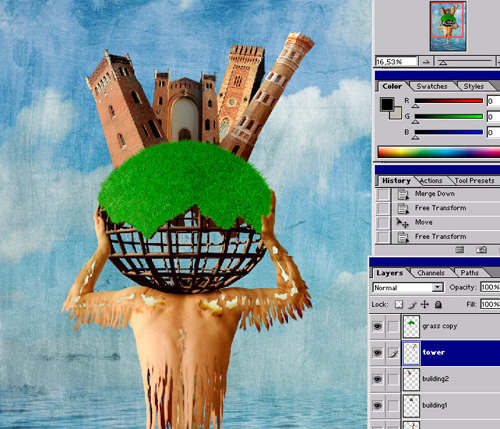
Open thebuilding1.psd go to Select-Load-Selection, Alpha1 then Edit-Copy(Ctrl+C). Close the image now and Paste(Ctrl+V) the selection in the atlas file and name the layer building1. Scale it down and distort it to
Make it look like the one in the Image25. Repeat the steps we done with the building 2.psd and building3.psd and try to arrange the building new like in the Image 26.
Image 26
Step 20
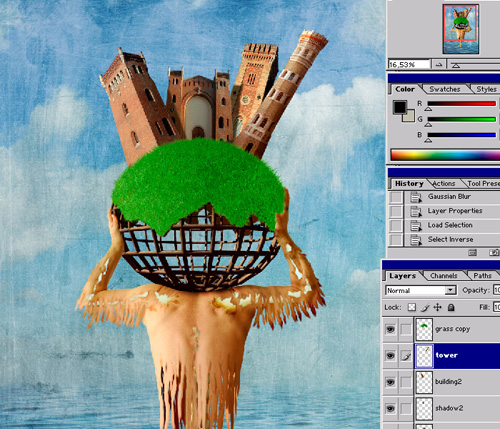
Now add two new layer one under the building2 layer and one under the building1 layer. Name them shadow and shadow1. Ctrl+click on the building1 layer and go back to the shadow layer to fill the selection with black. Now go to Filter-Blur-Gaussian Blur and blur with a 4px Radius . Now Ctrl+click
on the building3 layer to load the selection and Inverse the selection (Shift+Ctrl+I) and hit delete.
Repeat the steps with the shadow 1 layer and the building1 layer.
Image 27
Step 21
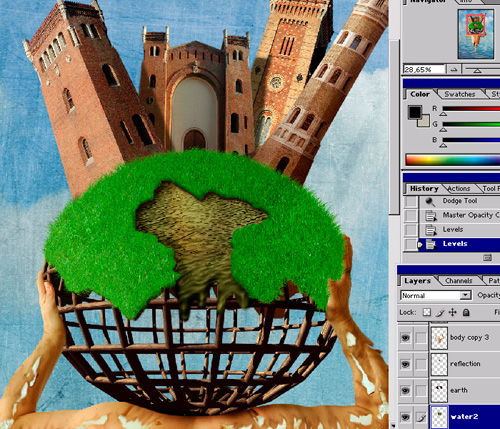
Open the water2.psd image and drag it under the earth layer then name it water2. Select the gras copy layer and use the lasso tool to draw a selection like in the image 28.
Image 28
Hit delete once then go to the grass layer and hit delete again after that go to the earth layer click on the Rectangular Marquee Tool(M) then using the down and right arrow key nudge the selection 4-5 pixels down and 1-2 pixels to the right. Use the Blur Tool (R) to blur the new created edges of the gras and the earth layer, also use the Burn Tool (B) to darken the edges of the gras layer and to add some shadows in the water, also use now the Lasso Tool (L) to cut the water layer like in the Image 29. Use the Rectangular Marquee Tool (R) and draw a selection on building1 Feather it(Ctrl+Alt+D) with a 3px Radius, copy(Ctrl+C) and paste(Ctrl+V) and name the new layer reflection drag it over the water2 layer.
Go to Filter-Distort-Ocean Ripple and set the size and the Magnitude to 11. Now set the blending mode for the layer to Soft Light and reduce the layer Opacity to 35%, if everything was done proper you should have something like in the Image 29.
Image 29
Step 22
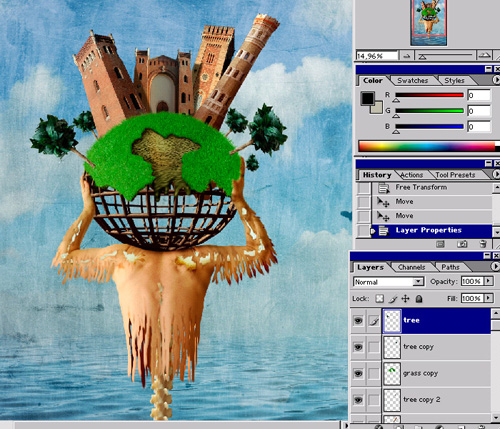
Open the newtree.psd file from the source folder and drag it in the atlas file, name it tree and place the layer under the grass copy layer.Ctrl+Click on the tree layer to load the selection then Feather it(Ctrl+Alt+D) with a 3px Radius, Inverse the selection (Shift+Ctrl+I) and hit delete once, now go to Filter-Blur-Blur More and the scale down the tree using the Free Transform Tool (Ctrl+T) and go to Edit-Transform-Flip Horizontal. Now make 4 tree copy, and use the Free Transform Tool to scale, rotate, skew the opy and to arrange them like in the Image 30.
Image 30
Step 23
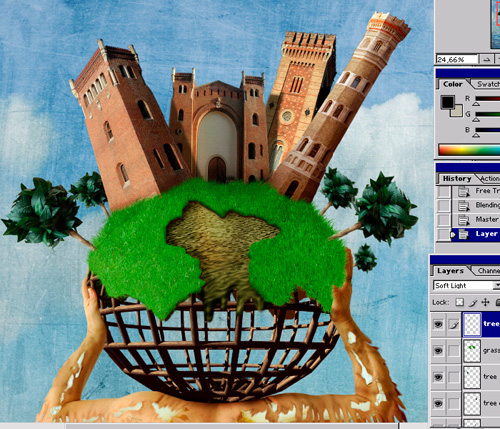
Now save the progress and then save the file under a new name like atlastwo. Now link all the building and building shadows layers and then Merge Linked together (Ctrl+E). Now Ctrl+click on the new tower layer to load the selection then go to the grass copy layer at the top and use the Eraser Tool (E) to erase the grass a bit using the shapes of the buildings bottom as guide. Then click on the eye icon of the grass copy layer to hide it and use the Clone Stamp Tool(S) and the Healing Brush Tool (J) to get rid of the unwanted shadows and to add parts where is need for. Now go back to the grass copy layer and use the Clone Stamp Tool(S) with the Grass Brush again to recreate the grass look at the buildings bottom, after that use the Burn Tool(B) to add some shadows at the bottom of the building and on the grass where it is logical need for, to have something like in the Image31
Image 31
Step 24
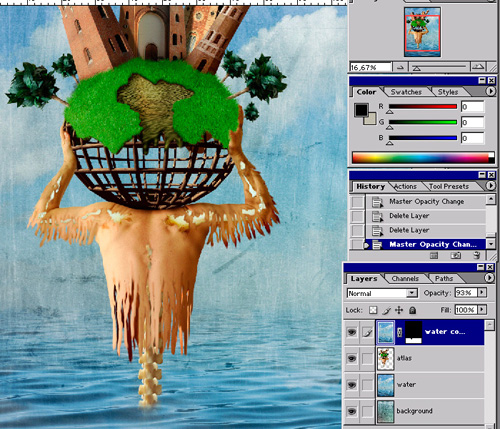
Now delete the first body layer because we don't need it anymore save the file and save your file. Now turn off the visibility of the background layer and the water set layer by clicking on the eye icon and then select the first layer go Layer-Merge Visible (Shift+Ctrl+E)rename the new layer atlas, after that select the water set and go Layer-Merge Layer Set (Ctrl+E). Now move the atlas lare a bit to the left and down. Create a water layer copy and drag it over the atlas layer set the Opacity to 90%, now add a layer mask to the new water copy layer and using the Rectangular Marquee-Tool (M) create a selection over the upper part of the image and with a soft round brush and black color paint out the part of the spinal where it meets the water like in the Image 32.
Image 32
Step 25
Now select the atlas layer and make a copy, drag it over the water copy layer and go Edit-Transform-Flip Vertical and go Edit-Transform-Distort and by dragging the upper mark point try to make it look like a body reflection in the water, then go to Filter-Distort-Wave and use the following settings: Number of Generators 6, Wave Length Min.1 Max.99, Amplitude 34 and 76, Scale 100 and 6 and Warp around checked. Now set the blending Mode of the Layer to Hard Light and the opacity to 50% like itn the Image33.
Image 33

Step 26
Now open the water3.psd file from the source folder and drag it into the main image place it at the bottom of the atlas go Image-Adjustments-Hue/Saturation(Ctrl+U) check the Colorize box and set the Hue to 205 and the Saturation to 38.Go now Image-Adjustments-Color Ballance(Ctrl+B) and set Midtones Cyan -1,Green +6, Blue+4. Select the Eraser Tool (E) and use a big Soft Round Brush with a 80% Opacity and erase the hard edges of the water to make it fit in the image then add some shadows in the watercopy layer using the Burn Tool (B) and a big soft round Brush like in the Image 34.Save your progress now.
Image 34
Step 27
Ctrl+click on the atlas layer to load the selection, go to the Channels pallete and click on the icon at the bottom to Save selection as channel. Go back in the layer mode and deselect then make a background copy and drag it at the top. Click on the background copy eye icon to turn off the visibility then go Layer-Merge Visible (Shift+Ctrl+E)
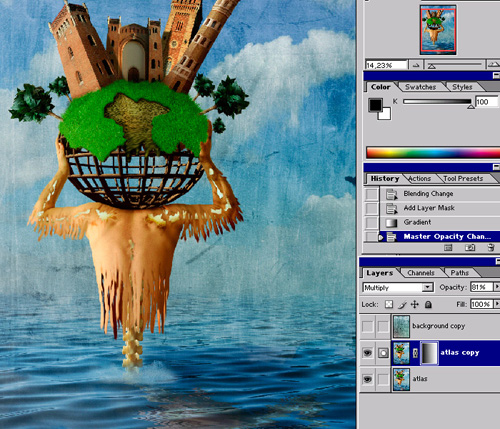
Save the file under the name final, now duplicate the atlas layer and Set the blending mode to Multiply and the opacity to 80% also add a Layer Mask and use the Grabient tool (G) with a Linear gradient, Black-White and make a graduation fro let to right like in the Image35.
Image 35
Step 28
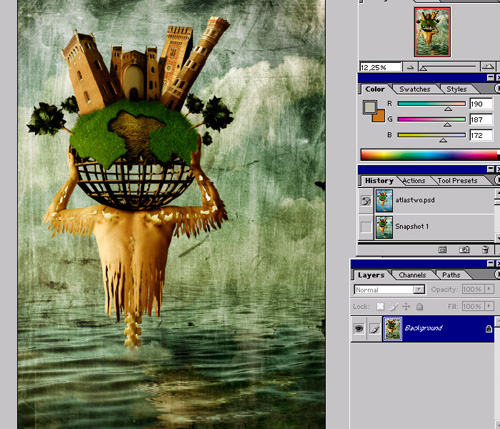
Merge the two atlas layer now the make a copy again and go to Image-Adjustments-Desaturate and again go Image-Adjustments-Hue/Saturation and set Hue to 50 and Saturation to 35, set the blending mode to Soft Light . Select the background copy layer and set the blending mode to Hard light and the opacity to 60%. Go Select-Load Selection and chose Alpha1 to load the alpha selection, now use a big Soft Round Brush to erase the background copy part into the selection. Merge the layer together and make a new copy then go Image-Adjustments-Hue/Saturation set Hue to 50 and Saturation to 25 and the Opacity to 30%. Select the Burn Tool (O) and with a big Soft Round Brush darken the upper part and the right part of the image to have something like the in the Image36.
Image 36
Step 29
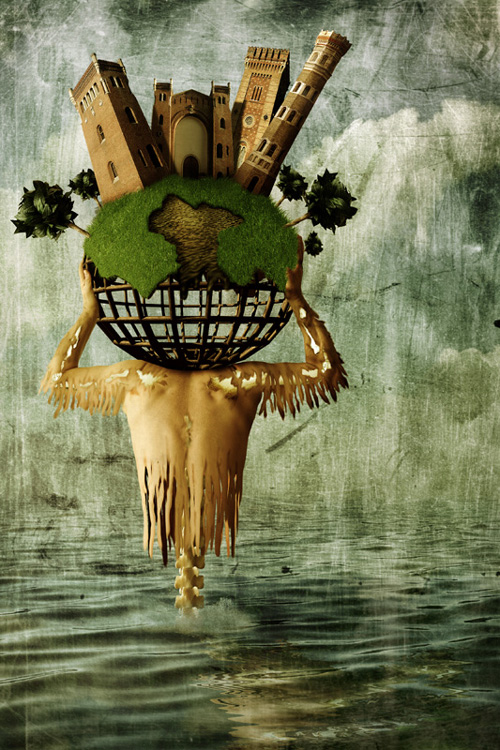
Of course you could use your own settings for the last steps if you wish to have an oder mood, colder with more green and blue or to use the Adjustments-Levels(Ctrl-L) if you want a lighter or darker image. At this point I use the Blur Tool (R) witha a big soft round Brush ani I carefully blur the bottom part of the image to create the illusion of close blur and at least I create a new document 3600 high and 2400 wide and 300pixel/inch Resolution, copy and paste the atlas image in the new document then I scale it and arrange it to fit in. When you have reached the mood and look you desire save your file again as .tiff and you are done.
I hope you have enjoyed this Tutorial. That's is it. We are done.
Image 30
Copyright © 2011 Teodoru Badiu & Apocryph.net. All rights reserved.